How to Use the Spinup Container Service
- Darryl Wisneski (Unlicensed)
Problem
How do I run a container in the spinup Container Service?
Solutions
Simple Use Case - Deploy an Nginx Container
Let's deploy a container from a public docker repository without modifications, and no code installed.
We will deploy the nginx:latest docker image. We won't create any environment variables, nor secret environment variables.
- Click Create in your space
- Scroll down to Containers and under Container Service, click Select.
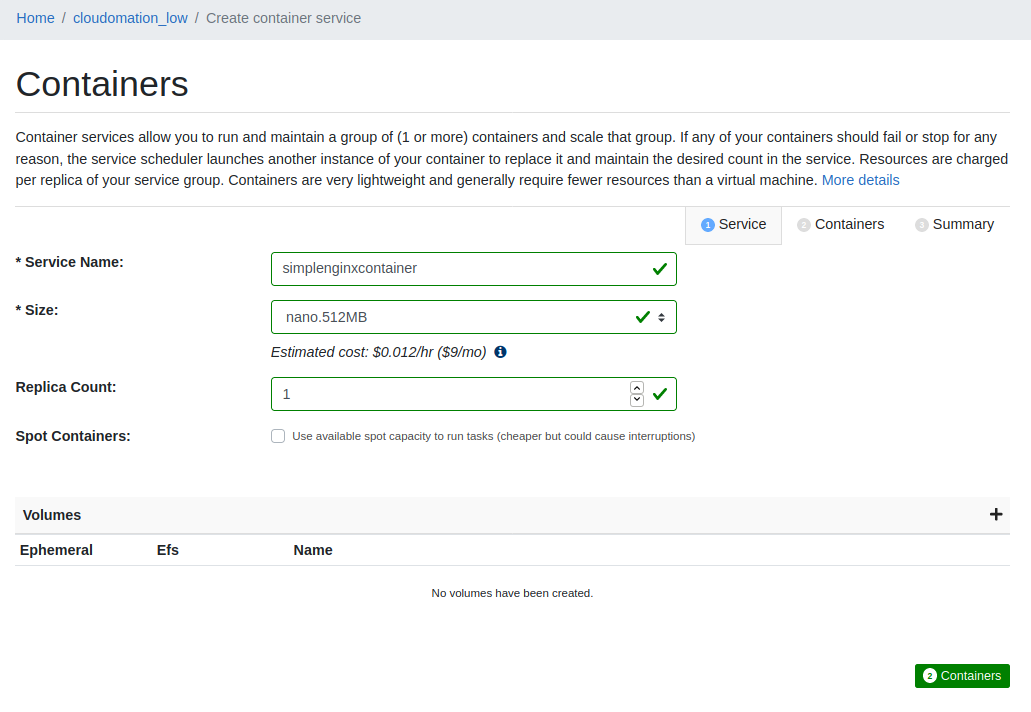
- On the Containers page enter a Service Name: simplenginxcontainer
- Choose Size: nano.512MB
- Leave the rest of the fields at their default, click 2. Containers
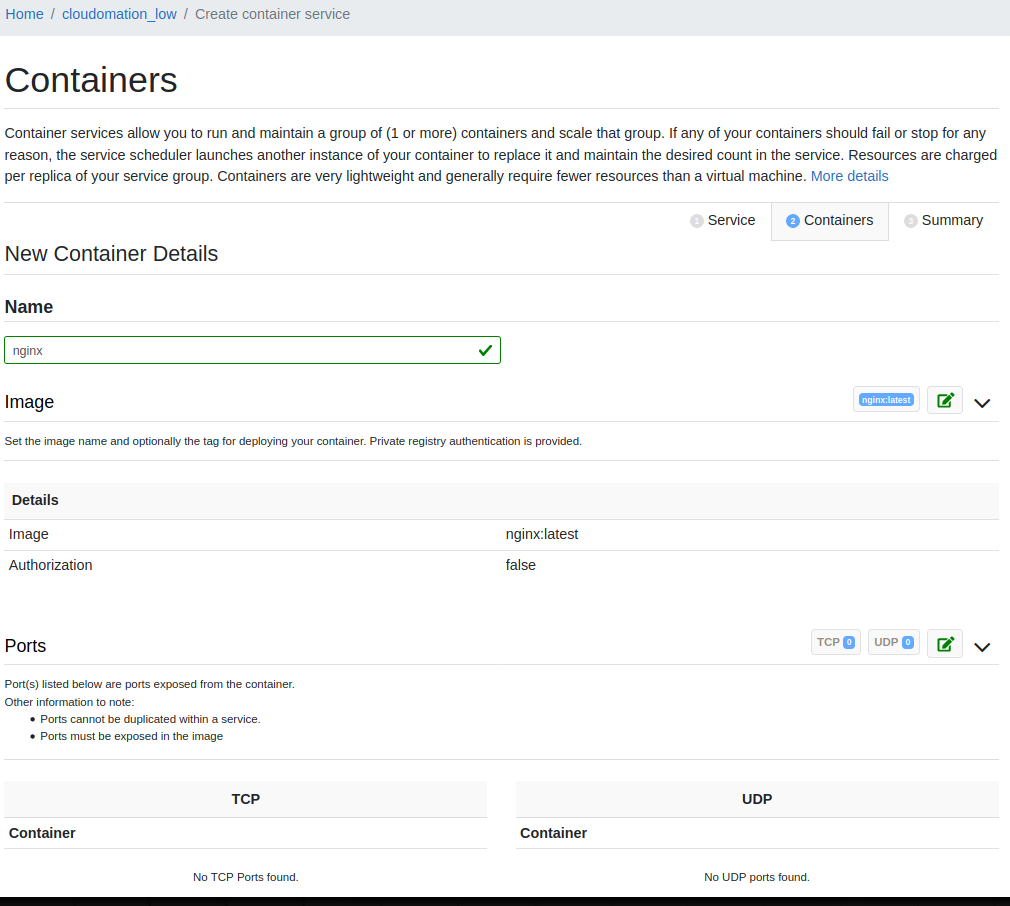
- You are on the New Container Details page - for the task definition
- Enter a Name: nginx
- Enter an Image: nginx:latest, and tab out of the field - it will show a successful green check if spinup finds the container
- Click the green checkbox to accept that change
- Leave the rest of the fields as-is, and choose + Add Container
- Click 3. Summary - nearer to the top of the page
- You will see a summary of the container service, and Estimated Cost - image not shown
- Choose Create Service
The end-result of creating a container service, below

The spinup service will launch the container in ECS FARGATE. Look around at the Container resource page - the Definitions, Tasks, Events, and Metrics tabs show details of the running container,. Change ports configuration, environment variables, and/or secret environment variables, then choose Redeploy the deploy new container(s) with the new configuration. A new container set will boot, and the original set will shutdown.
Testing
Let's examine the Endpoint DNS Alias/hostname for the container service: spinup-001371-simplenginxcontainer.svc.spinup.yale.edu - substitute yours and follow along. Also, this Endpoint hostname can be used for internal use at Yale, or can be used as a backend for a load balancer.
Try to connect to it with curl on port 80:
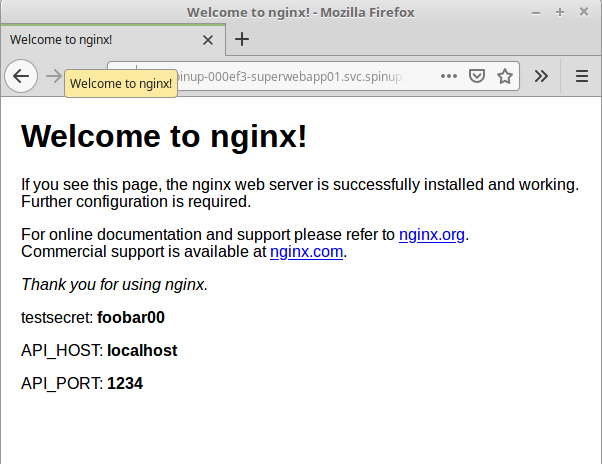
$ curl -s http://spinup-001371-simplenginxcontainer.svc.spinup.yale.edu |grep Welcome
[snip]
<title>Welcome to nginx!</title>
[snip]
and port 443:
$ curl https://spinup-001371-simplenginxcontainer.svc.spinup.yale.edu
curl: (7) Failed to connect to https://spinup-001371-simplenginxcontainer.svc.spinup.yale.edu port 443: Connection refused
Outcome
You have deployed a very simple container. The nginx:latest container takes no input, or variables, but shows how easy it is to launch a container.
Complex Use Case #1 - Deploying a Nginx Sidecar Container Service to Provide End-To-End Encryption to a Backend Webapp
Let's deploy an nginxproxy sidecar container to encrypt connections into our web-app container. Why? Security of course. A load balancer can be configured to talk over an encrypted channel through to the backend webapp: TLS HTTPS port 443 instead of HTTP port 8080. The nginxproxy container used in this example is production ready.
Most applications are not good at hosting and terminating TLS connections. Nginx can terminate TLS connections with minimal configuration. We've provided a very easy to use publicly available container for just this purpose. The nginxproxy container can be influenced by adding environment variables in the Container (Task) Definition. We will illustrate this below.
We will use two images in the docker hub yalespinup public repository. We've also added links to the container source code in github:
- nginxproxy
- yalespinup/nginxproxy:latest
- https://hub.docker.com/r/yalespinup/nginxproxy
- https://github.com/YaleSpinup/nginxproxy-example
- testapi - a simple test API/webapp
- yalespinup/testapi:latest
- https://hub.docker.com/r/yalespinup/testapi
- https://github.com/YaleSpinup/test-api
container configuration
The nginxproxy container will listen on port 8443 by default - add an environment variable LISTEN_PORT with the value 443 in the container definition. This will influence the nginxproxy container to listen on port 443 as well as its default 8443.
We configured the following Environment Variables:
- LISTEN_PORT: 443
- CERT_SUBJECT: /CN=awesomewebapp-20200911
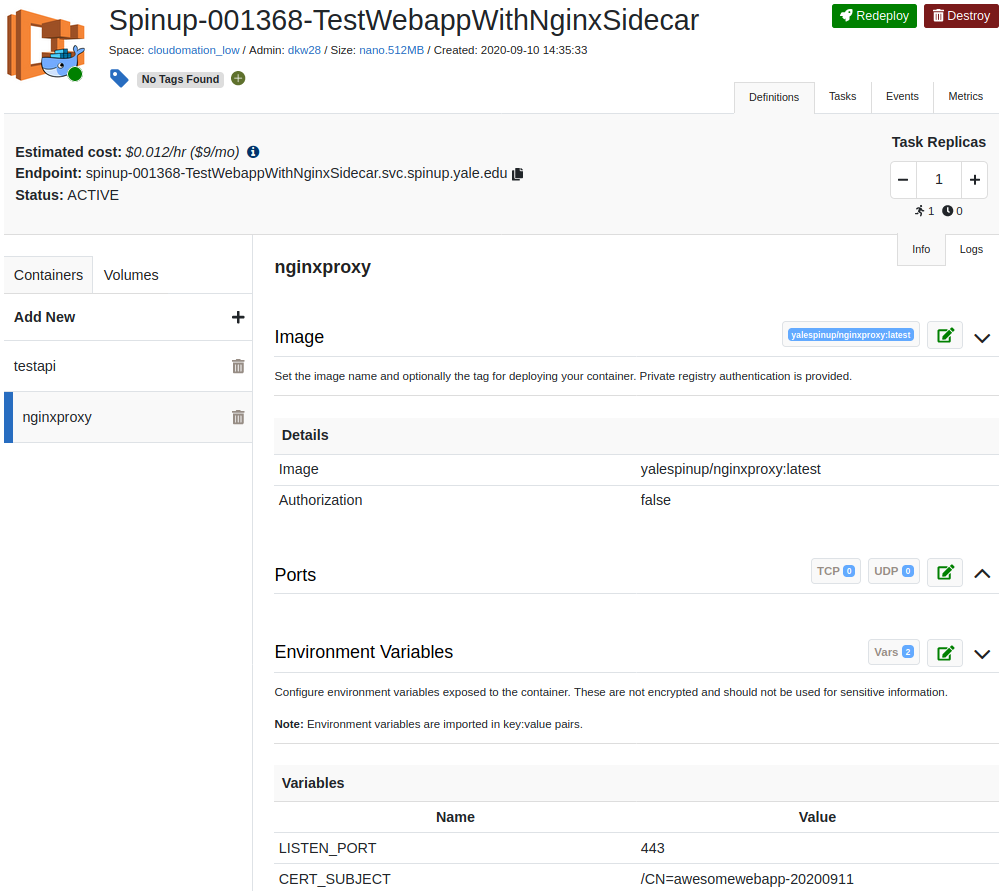
testapi container
The testapi webapp container will listen on port 8080 by default - no environment variables are necessary.

Testing
Let's examine the Endpoint DNS Alias/hostname for the container service: spinup-001368-testwebappwithnginxsidecar.svc.spinup.yale.edu - substitute yours and follow along. Also, this Endpoint hostname can be used for internal use at Yale, or can be used as a backend for a load balancer.
Notice, for the nginxproxy container service, we've also added an environment variable CERT_SUBJECT with the value "/CN=awesomewebapp-20200911." This will modify the CN of the self-signed certificate. You can see this output in curl:
$ openssl s_client -connect spinup-001368-testwebappwithnginxsidecar.svc.spinup.yale.edu:443 |openssl x509 -text -in - |grep awesomewebapp-20200911
[snip]
Issuer: CN = awesomewebapp-20200911
[snip]
Try hitting the testapi. Use the /v1/test/routes URI to see the rest of the endpoints.
$ curl -s -k https://spinup-001368-testwebappwithnginxsidecar.svc.spinup.yale.edu/v1/test/routes |jq .
[
"ANY /metrics",
"ANY /v1/test",
"ANY /v1/test/args",
"ANY /v1/test/env",
"ANY /v1/test/metadata/task",
"ANY /v1/test/metadata/stats",
"ANY /v1/test/metadata/task/stats",
"ANY /v1/test/mirror",
"ANY /v1/test/panic",
"ANY /v1/test/ping",
"ANY /v1/test/routes",
"ANY /v1/test/status",
"ANY /v1/test/version",
"ANY /v1/test/readme"
]

curl -s -k https://spinup-001368-testwebappwithnginxsidecar.svc.spinup.yale.edu/v1/test/version |jq .
{
"Version": "0.0.0",
"Buildstamp": "",
"Githash": ""
}
Outcome
The nginxproxy sidecar is super easy to add your container service. Your webapp will be accessible by a load balancer on port 443, fully encrypted, between the load balancer, and the backend webapp.. This is good news for compliance and regulation.
Complex Use Case #2 - Using Container Secrets and Environment Variables to Configure an Advanced Nginx Configuration
The following example is based on a pre-configured public docker container available in dockerhub which was built from https://github.com/YaleUniversity/nginxcontainerenv. The container image is ready to accept three environment variables and display the variables in a semi-dynamic nginx configuration - changes to container can be made at deployment. The ENVs are derived from the container at startup and nginx consumes them as it starts. We will create the following ENVs:
- API_HOST
- API_PORT
- testsecret
Follow along exactly to get similar results - this is an excellent showcase of how container variables work and can be useful in a live example.
Create a Secret in your space
The first step is to create a secret within your space. We will use this secret later when we create the container service.
Within your low-risk space - non-low-risk spaces do not support containers currently - click on the secrets tab. Choose Add secret.
Create a secret as follows:
Name = testsecret
Value = foobar00
Create a Container Service Name
Service name = nginxdynamicexample
Size = nano.1GB
Replica count = 1
Click 2. Containers
New Container Details
Name = nginxshowcase
Image = dkw00/createsecrets:nginxenv (this resource has to be available in dockerhub - hub.docker.com - or another publicly accessible docker repository)
Ports = 80, TCP (a one-to-one port mapping from the container to the host: e.g., 80 → 80)
Add Environment Variables:
API_HOST = localhost
API_PORT = 1234
Add Secret Environment Variables:
Name = testsecret
Value: select the testsecret variable from this space - that we created previously
Click Add Container
Click 3 Summary
Click Create Service
Testing and Outcome
Examine the Endpoint DNS Alias/hostname for the container service: spinup-001399-nginxdynamicexample.svc.spinup.yale.edu - substitute yours and follow along.
Try changing the environment variables and secret within the container and redeploying. Did they change?
Your service will be created, and within a reasonable amount of time the DNS resource will be available.
Related articles