How do I use a Secure Data Set?
What is it?
Secure data set is an offering in Spinup that allows users to work with a sensitive data set and manage access, and data use agreements. You can create it in any moderate or high-risk space and then attach selected secure servers in that same space to the data set so you can perform computations against it. There are two types of data sets currently supported: original (immutable once created and finalized) and derivative (can be constantly modified and added to). An example of an original is a data set that you purchased or otherwise obtained, that is bound by a specific data use agreement and cannot be modified, however, you want to be able to work with it or give other users access to it. A derivative is more flexible. It could be derived from another data set, e.g. if you need to make modifications without affecting the original, or it could be used to store the output of specific calculations against an original. A derivative data set can be promoted to an original at any point which will make it immutable.
How does it work?
Secure data sets in Spinup are based on AWS S3 - we create a bucket where you will upload your data set (this can be any collection of files). In addition, we keep various metadata about the data set and manage access to it by generating an access key (for the initial upload) or assigning instance roles to selected servers. For example, when you create an original data set we set up an empty bucket (at that point the data set is in a pending state) and let you generate an access key that can be used to upload the data using any S3 client (e.g. from your workstation). Once all files are uploaded, you finalize the data set which disables all access keys. In order to meet security requirements, once the data set is finalized you can only access it from hardened Spinup servers in that space. One data set can be attached to several different servers, and you can also attach multiple data sets to a single server. You will be charged for the S3 storage for the data set plus any servers that you create to work with the data.
How do I use it?
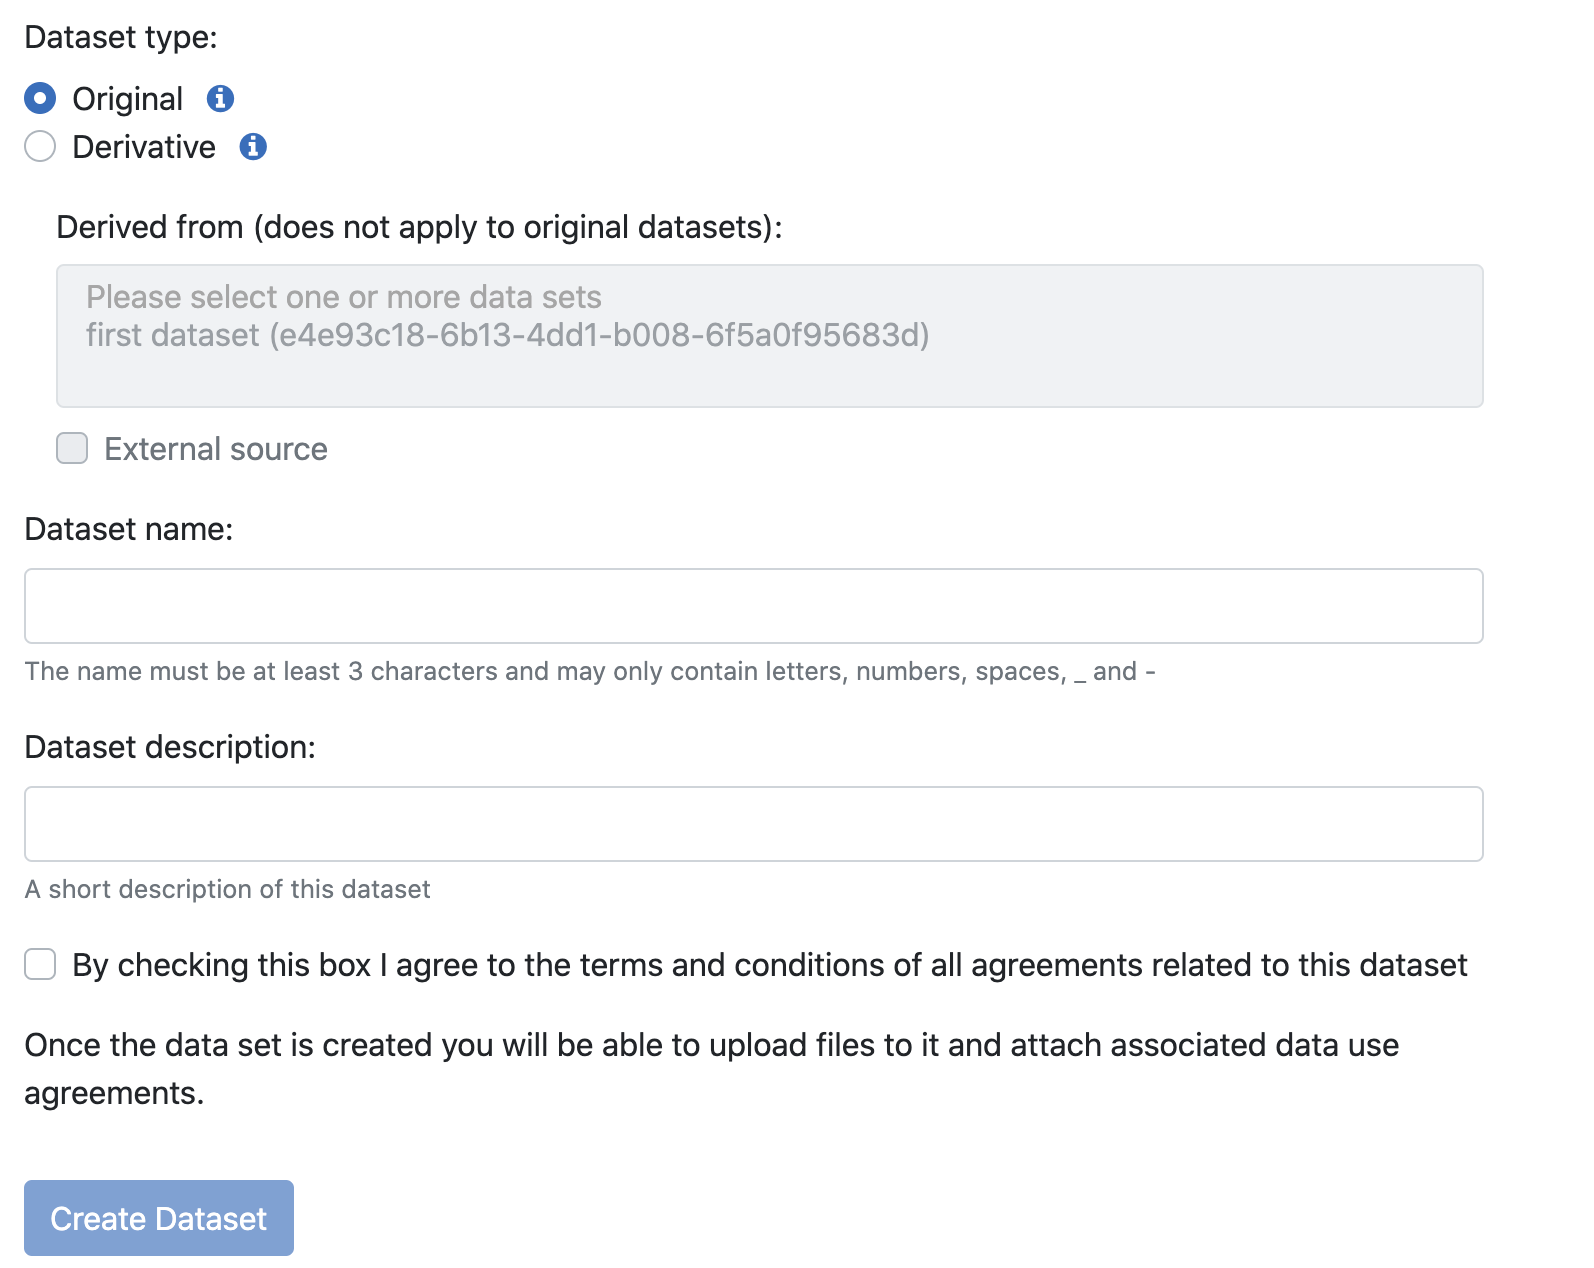
From your Spinup space create a new "Secure data set" resource. Note that it is only available for moderate and high-risk spaces.
Pick the type of data set (original or derivative), enter a name and description and click Create Dataset.
Note on derivate data sets:
If this is a derivative, you can pick one or more data sets (in the same space) that it's associated with - they could be originals or derivatives. You can also check "External source" if the source data set is not in the same space.
When creating a derivative, no data will be copied to it automatically and you will need to upload any applicable agreements!
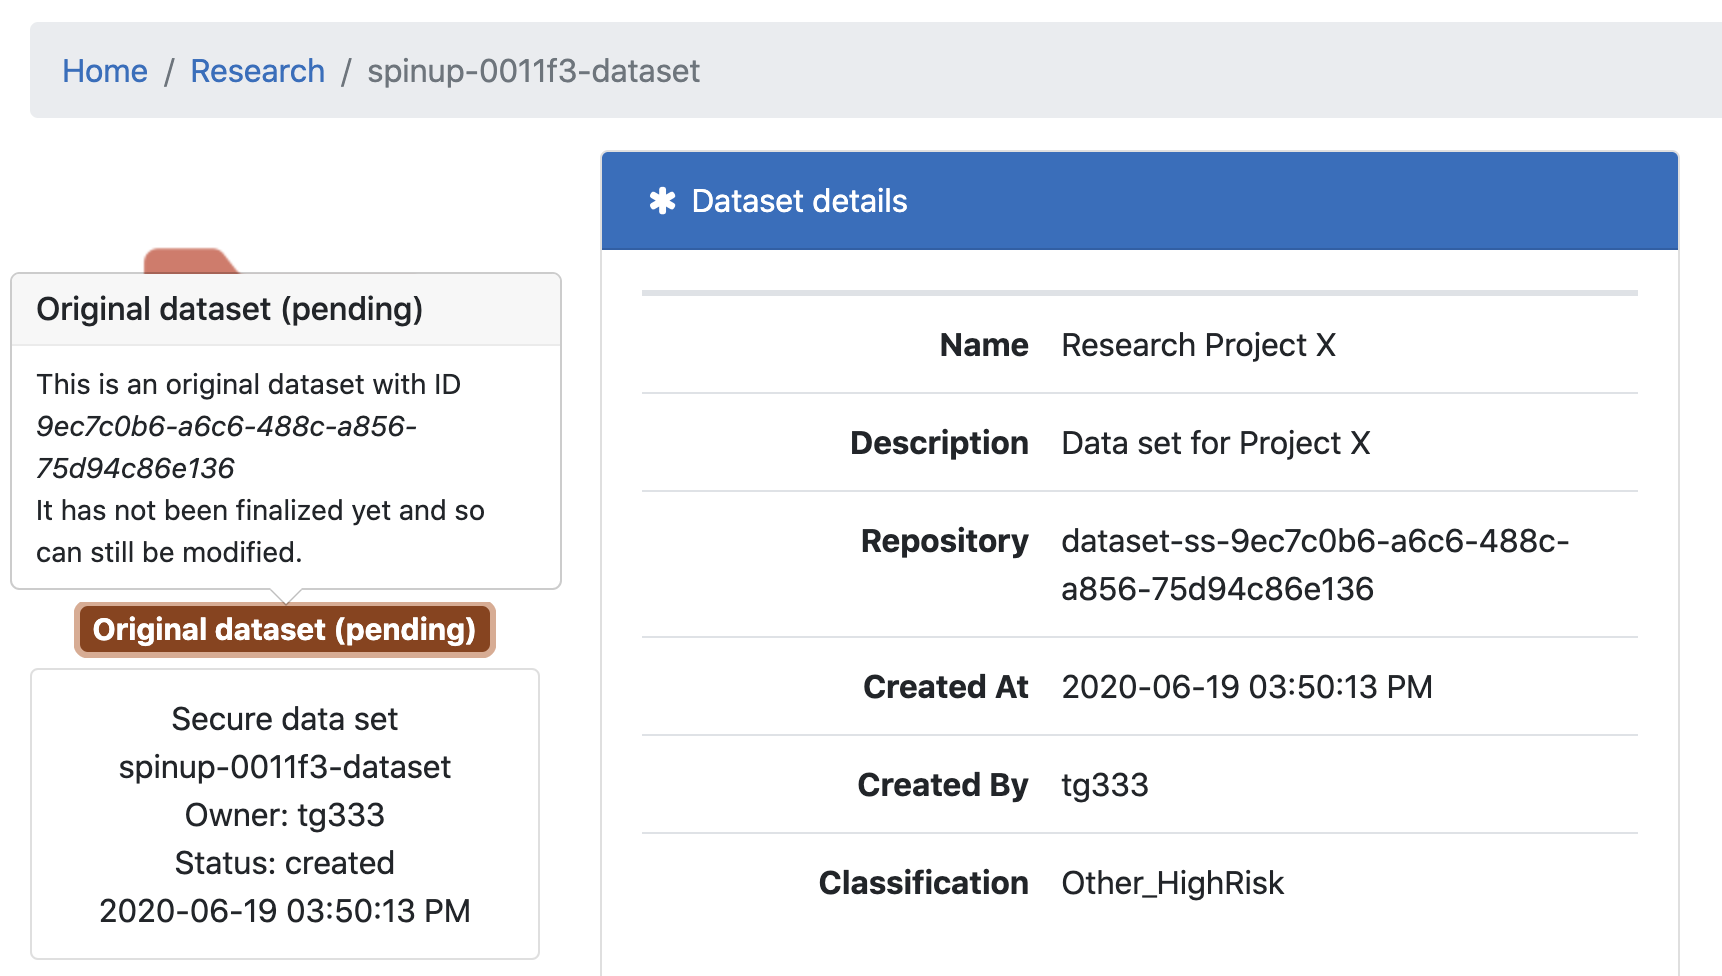
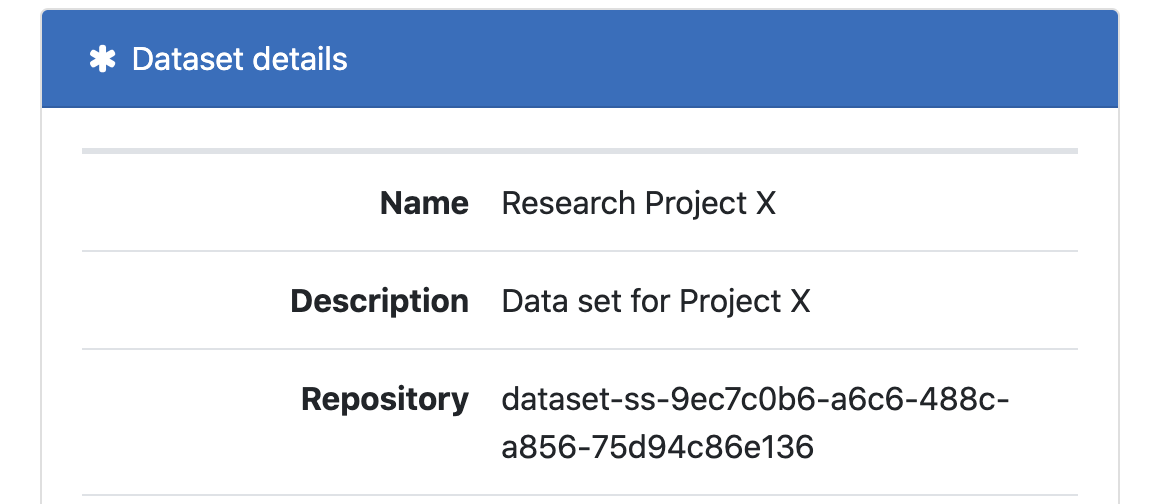
On creation you should see some information about the new data set. We automatically generate a unique ID for each data set. Note the Repository is the actual name of the S3 bucket that will hold the data.
In the below screenshot you can see that this is an original dataset that is pending, so we need to populate it, attach any applicable agreements and then finalize it.
Managing attachments
From the "Dataset attachments" panel at the bottom, click the + and upload any files associated with this data set (e.g. a Data Use Agreement or End User Agreement). You can upload as many attachments as you want and those will be stored with the data set in a special _attachments folder in the S3 bucket.
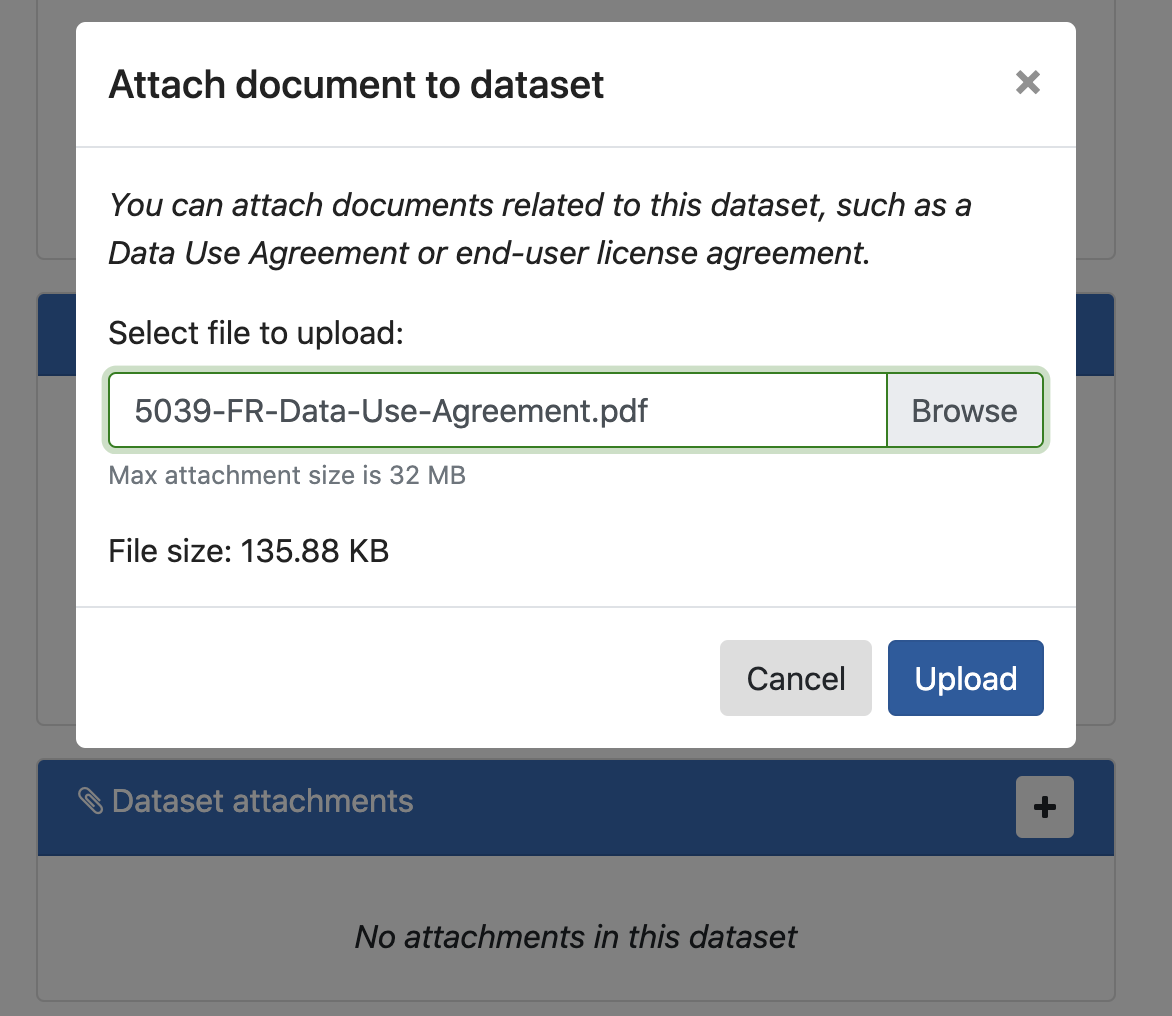
Once an attachment is uploaded it will show up in the panel with a link that downloads/opens the document. The link is pre-signed and expires in 5 minutes to prevent sharing.

Note: Currently, you can add and remove attachments at any time, although eventually we may need to restrict that or at least disable attachment removal once a data set is finalized.
Uploading data set files
In order to upload the files that are part of the data set we need to generate an access key and use any S3-compatible client from the laptop or workstation where the data is currently stored.
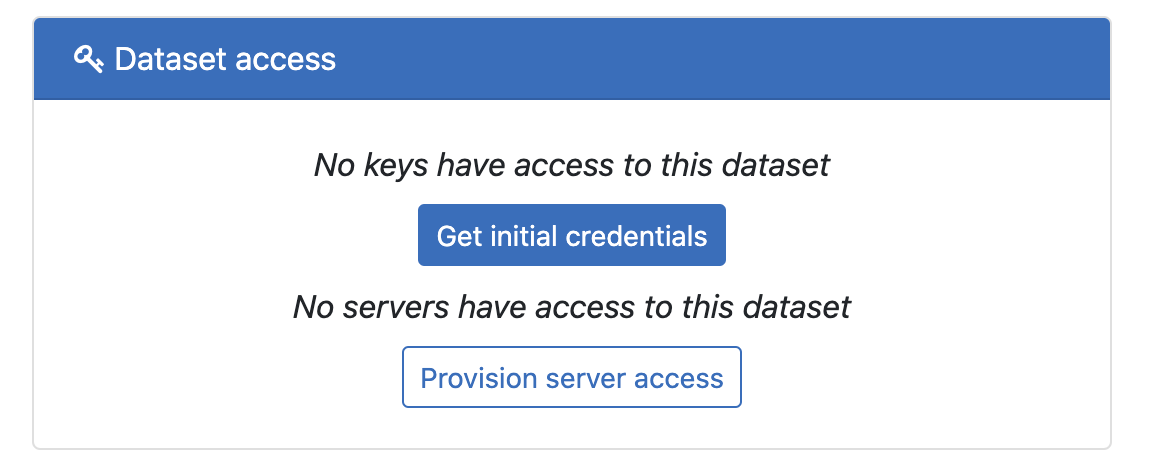
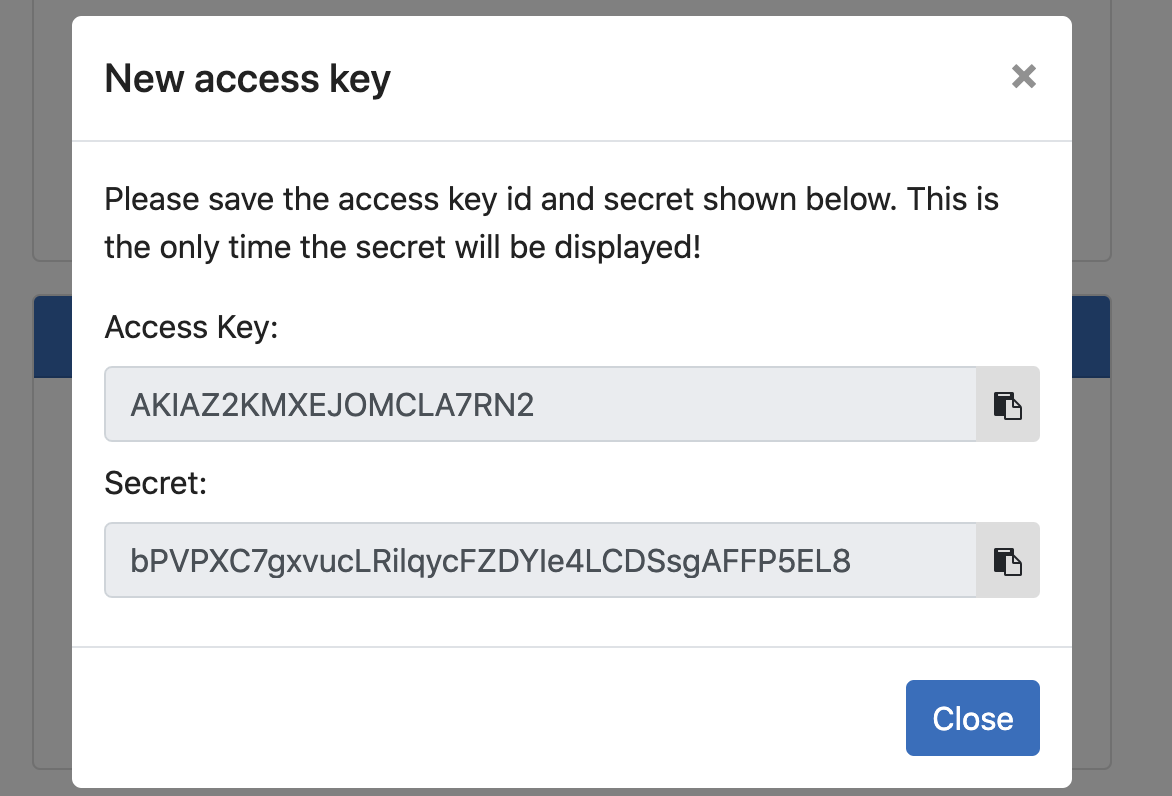
In the "Dataset access" panel click "Get initial credentials" and then click "Get access key"
Copy the Access Key and Secret and save them somewhere because there is no way to get the Secret after this modal is closed.
Using the above credentials, connect to the S3 bucket for this data set - the name of the bucket is listed under the Repository field (in this case it's dataset-ss-9ec7c0b6-a6c6-488c-a856-75d94c86e136):
You can use this procedure if you need help connecting to the S3 bucket: How do I use a Spinup S3 bucket? It will show you 3 ways of connecting (you can pick one that you like, we recommend CyberDuck): 1) AWS CLI, 2) CrossFTP, 3) CyberDuck.
Once you connect, just copy all files that are part of this data set. Depending on the size this may take minutes or days.
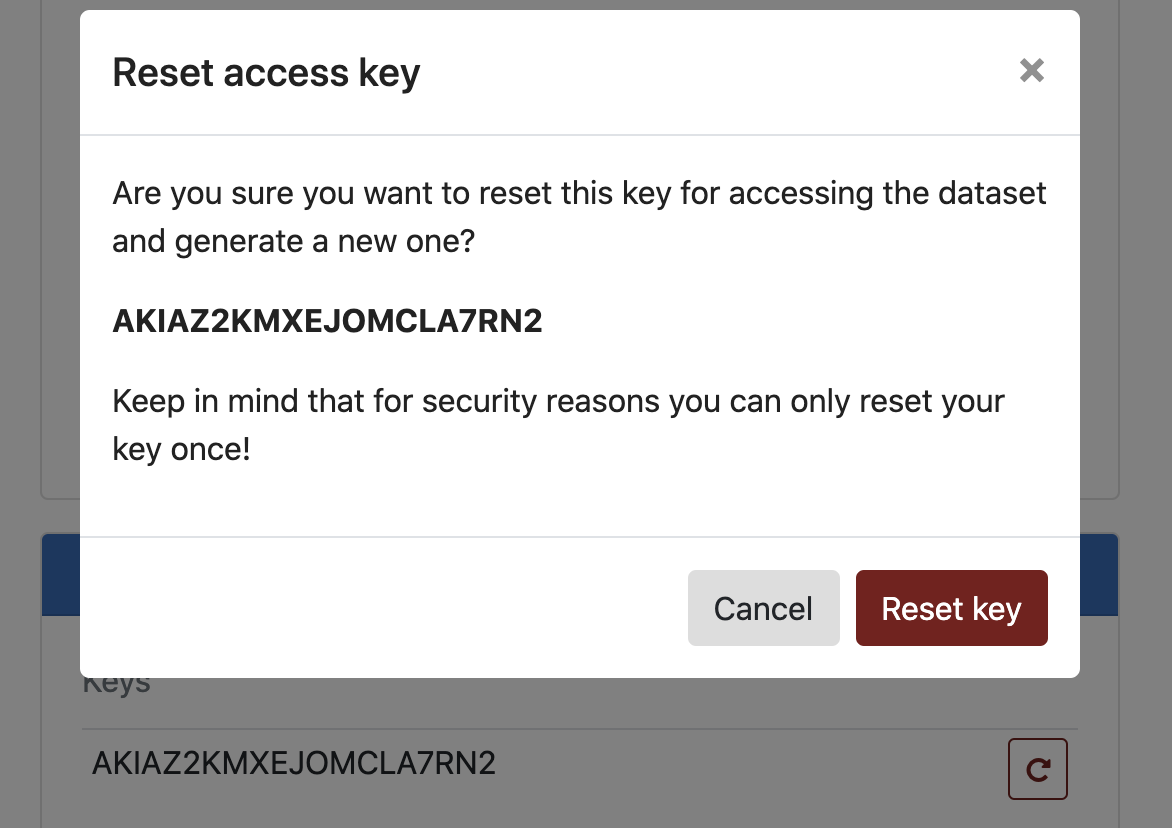
If you lose your Secret key you can reset it to get a new one from the "Dataset access" panel. Note that you can only reset the key one time for security purposes. If, for some reason, you need to reset it a second time you can contact Spinup support for help.
At this point we'll assume that all files have been uploaded and the data set is ready to be finalized.
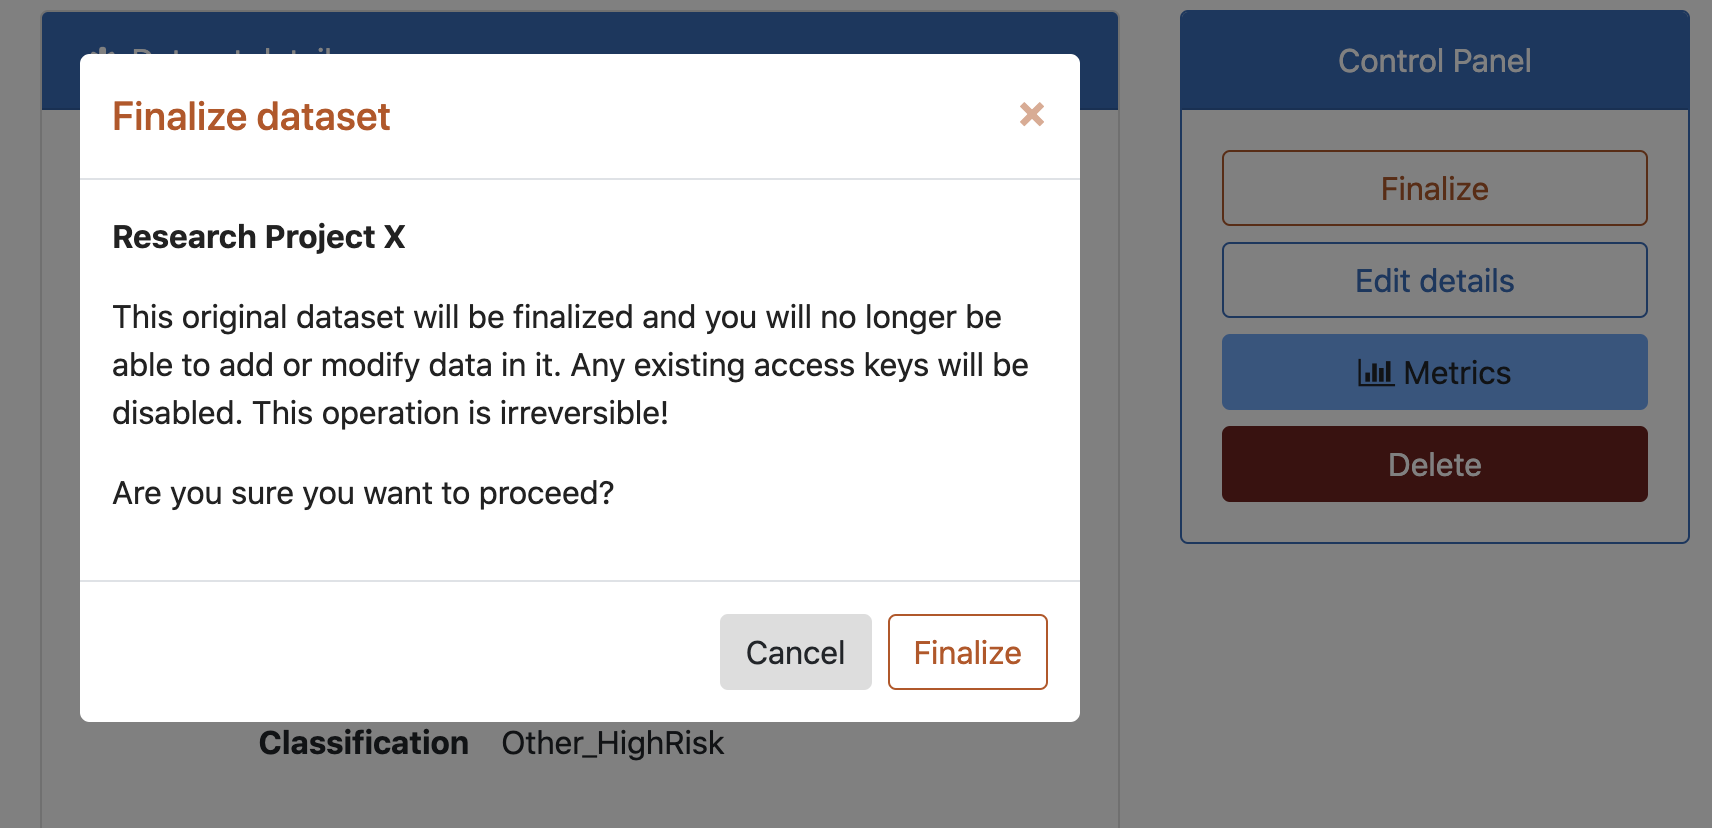
From the "Control Panel" click Finalize and then confirm. Note that if this is an original you will no longer be able to add/change/delete files after finalizing it. If this is a derivative you will no longer be able to use an access key to connect to the S3 bucket, however, you can still make changes to the data set when you connect from a secure server in the same space.
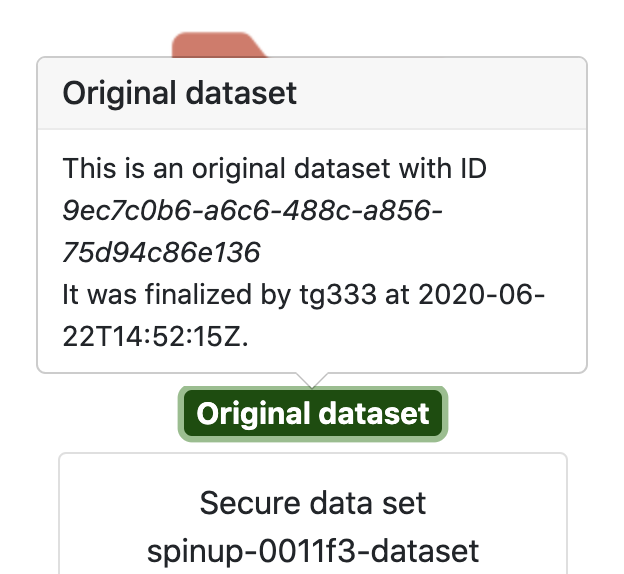
After finalizing the state of our data set changes from pending to just Original dataset:
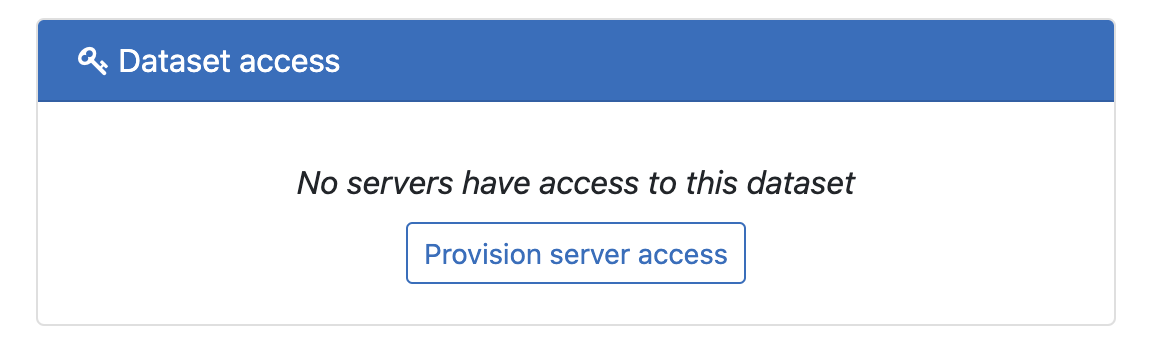
All access keys are also removed and the the only way to access the data set at this point is by attaching a server to it.
Managing server access to data set
By default no servers have access to a new data set. You will need to create a server in the same space if you don't already have one. To do that, go to your space, click Create and pick one of the Server offerings - it can be any Linux or Windows OS. For this example we are going to use a CentOS 7 server.
From the "Dataset access" panel click Provision server access:
Pick a server from the list and click Provision access
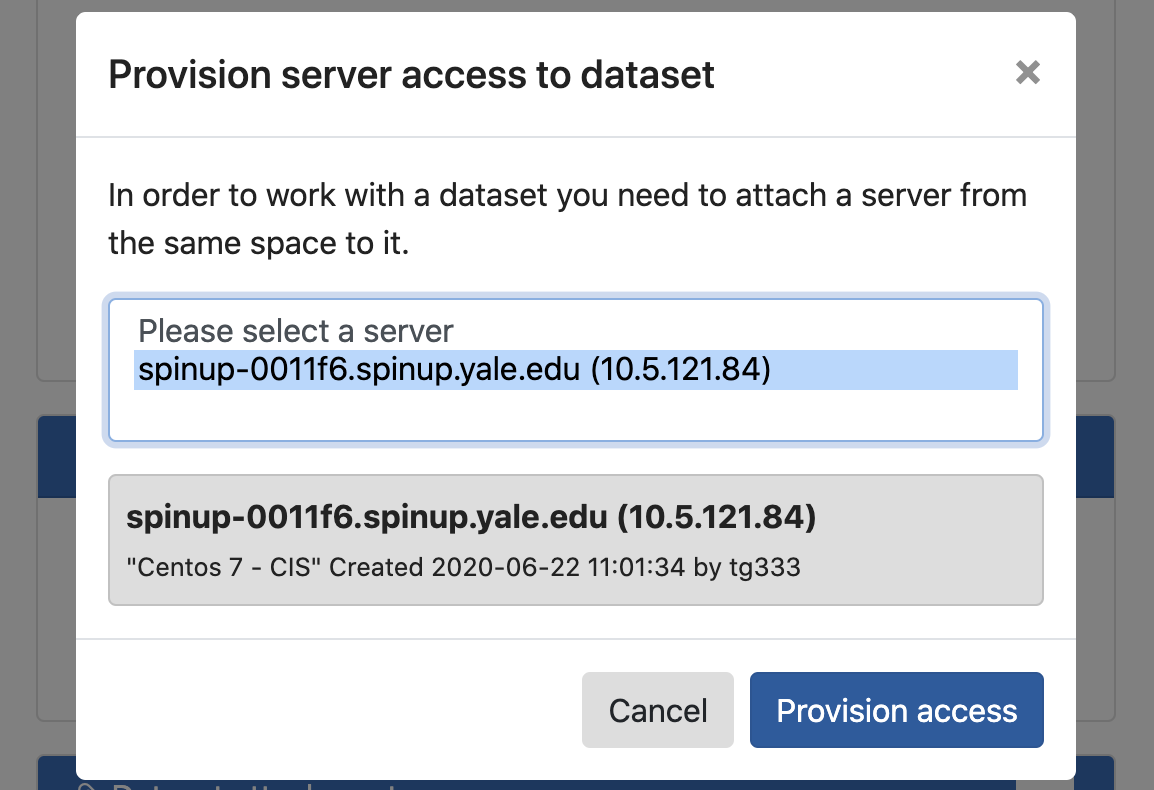
After a few seconds the server should show up in the list:

At this point the above server has been granted access to this data set. More specifically, it has an AWS instance profile policy that allows it to connect to the underlying S3 bucket without using any credentials. This means that when you log into that server you can connect to the data set repository using any S3-compatible client or the AWS CLI and you don't need to provide an access key and secret.
We can, at any time, revoke access from a server by clicking the trash bin next to it.
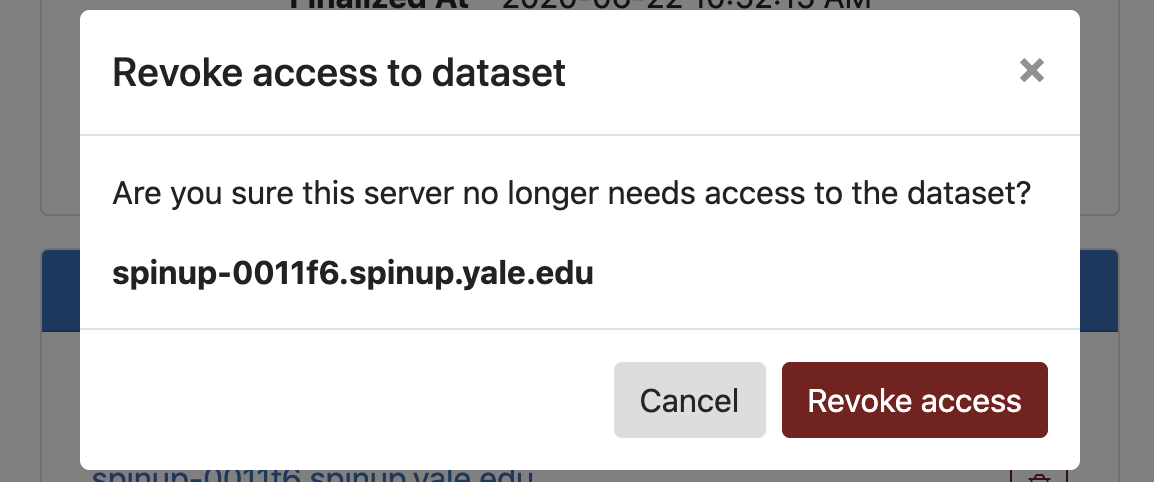
Clicking Revoke access will instantly remove the access policy from that server, effectively cutting off any connections to the data set. If needed, you can re-enable access later by adding the server again.
Mounting a data set from a Linux server
Depending on your use case, you may need to mount the data set as a file system, e.g. if you need to run some script against it that expects to read files. On Linux you can use the free s3fs utility to do that. Their Readme has instructions about installing it on different Linux OS flavors: https://github.com/s3fs-fuse/s3fs-fuse).
First, ssh into the server (you'll be prompted for MFA authentication).
Run the following commands to install s3fs on CentOS:
sudo yum install -y epel-release
sudo yum install -y s3fs-fuse
Or, to install on Amazon Linux
sudo amazon-linux-extras install epel
sudo yum install -y s3fs-fuse
Or, to install on Ubuntu:
sudo apt install s3fs
Confirm it's installed:
$ s3fs
s3fs: missing BUCKET argument.
Usage: s3fs BUCKET:[PATH] MOUNTPOINT [OPTION]...
We just need to specify the S3 bucket name (the Repository name, which in this case is dataset-ss-9ec7c0b6-a6c6-488c-a856-75d94c86e136) and a mount point (e.g. /mnt). We need a special iam_role parameter to tell s3fs to use the attached instance role instead of credentials. In addition we add the allow_other, umask, and uid parameters to make sure the directory is accessible to users of the server without requiring the root user. Using a umask of 002 will allow access, to the directory, for all users on the server; to restrict access to only the user who mounts the data set and root use a umask of 077 instead. So we can mount our data set repository like so:
$ sudo s3fs -o iam_role=auto -o allow_other -o umask=002,uid=$UID dataset-ss-9ec7c0b6-a6c6-488c-a856-75d94c86e136 /mnt
$ sudo df -h
Filesystem      Size  Used Avail Use% Mounted on
devtmpfs        461M     0  461M   0% /dev
tmpfs           484M     0  484M   0% /dev/shm
tmpfs           484M   13M  471M   3% /run
tmpfs           484M     0  484M   0% /sys/fs/cgroup
/dev/nvme0n1p1   30G  1.9G   29G   7% /
tmpfs            97M     0   97M   0% /run/user/0
s3fs            256T     0  256T   0% /mnt
Note that if you give it the wrong bucket name or the server doesn't have permissions to this data set, s3fs will silently fail and the bucket won't be mounted.
You should now be able to go to /mnt and see all the files in this data set. If this is an original you will only be able to list and read the files, and if it's a derivative you'll also be able to create, modify and delete files.
If you want to make s3fs automatically mount this repository when the server boots up you can add an entry to /etc/fstab.
Mounting a data set from a Windows server
The Windows server instances are provisioned with Rclone and WinFsp. Rclone allows you to connect to cloud-based object stores from multiple vendors and synchronize your files. WinFsp is a FUSE driver that allows you to mount the cloud-based object store as a mapped network drive. For convenience, these utilities have been wrapped in Powershell scripts.
In order to create a persistent volume mount to your data enclave bucket, you must first launch a Powershell terminal session with elevated privileges:
- Press the Windows [⊞] key . On a Mac keyboard, use the Command [⌘] key.
- Begin typing Powershell.
- When the search result for Powershell.exe comes up, press the key combination [shift]+[ctrl]+[enter].
- Accept the User Access Control (UAC) request.
Within the elevated terminal session, enter the following command:
PS> New-S3RcloneDrive -BucketName dataset-ss-9ec7c0b6-a6c6-488c-a856-75d94c86e136 # BucketName from the example above
This will mount the specified S3 bucket to the next available drive letter on the system. This drive mapping will persist through shutdowns and reboots. In order to remove this drive, enter the following command:
PS> Remove-S3RcloneDrive -DriveLetter <Letter assigned to S3 mount>
PS> # Alternatively,
PS> Remove-S3RcloneDrive -BucketName <Name of S3 Bucket>
Related articles